The Basics of the Kitchen Remodeling Process

Before any work begins, finding inspiration and developing a budget is important. This will help you determine which remodeling ideas are doable and within your price range. The next step is to hire a contractor. This person will manage the renovation. They can get better rates on materials and help you make decisions about the project.

Design

remodeling

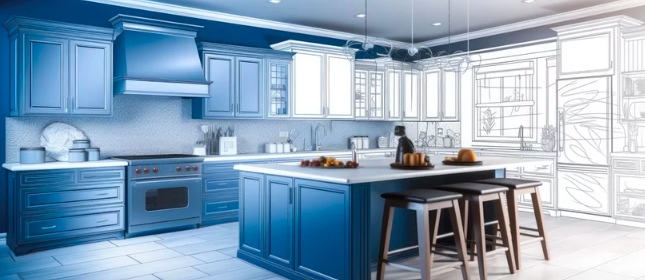
Whether you’re doing a full Kitchen Remodeling Lexington KY or a simpler refresh, the design phase is where it all starts. This can range from a cosmetic update to what she calls a full renovation, in which you keep the existing footprint but replace the fixtures and finishes. A complete remodel, or a “gut,” can involve moving gas and plumbing lines, changing the electrical circuitry, and dropping walls to change the layout.

The goal should always be to make your kitchen work for how you use it, she adds. That’ll help you choose the right appliances, cabinetry, backsplashes and flooring for the space. It’s also a good time to consider your budget and how you’re going to pay for the project, she says.

Some homeowners opt to hire a professional designer to create plans and drawings for the renovation before finding, hiring and managing a general contractor to put it all together. Other clients prefer working with a design-build firm that offers both services under one roof. This allows for a smoother project with less back-and-forth and more seamless coordination—and can often save you money.

Permits

When planning a kitchen remodel, you’ll likely need to acquire a permit for the work. The permitting process can vary by municipality, but generally, you’ll need to submit a thorough design plan and a detailed description of the renovation work you’re having done. The plan will be reviewed by a city inspector to ensure it meets the necessary requirements and guidelines. Inspectors will also visit your site at various stages during the project to ensure that the work is progressing as planned and aligns with the approved plans.

Most remodeling projects will require permits. However, there are some projects that may be exempt from this requirement. Non-structural upgrades such as changing out cabinet hardware or upgrading lighting fixtures might not require a permit. You’ll need to consult with experts like NYKB to determine whether a permit is required for your specific remodel.

Some homeowners are tempted to skip the permit process and save on money. However, doing so can cost you more in the long run. Local authorities will send you a stop-work order and issue hefty fines for conducting unpermitted construction. Additionally, a renovated kitchen without the proper permit can be harder to sell when you’re ready to move on. Moreover, insurance companies will not cover damages caused by unpermitted work. This could leave you out of pocket for a substantial amount of time. So, be sure to consult with your contractor to make sure you’re following the correct procedures when getting your permit for your kitchen remodel.

Demolition

Demolition is the first step in any kitchen remodeling project. It can include removing existing cabinets, appliances, and countertops. It can also include structural changes, such as relocating or adding walls. It may also involve updating plumbing and electrical wiring. If you are doing a full gut renovation, the demolition could involve stripping down to the studs and then building up to accommodate your new design.

Before starting demolition, you will need to prepare your home by sealing off the area and covering it with plastic sheeting. It is also a good idea to close off kitchen vents and turn off the water. It is best to hire a professional contractor for this step.

You should also make alternative kitchen arrangements during this time. This will keep your family from eating out and save you the cost of food deliveries. It’s also a good idea to have a plan for disposing of debris and trash.

Once the demolition is complete, your contractor will start on the rough construction phase. They will build a frame out of wooden studs, which is what will be covered with drywall later in the process. They will also add insulation if necessary. This is when they will also update plumbing and do any other projects that need to be done behind the walls. This is called “rough-in” work in the industry. It is not a project you should try on your own, unless you have a lot of experience.

Plumbing

A kitchen remodeling project involves plumbing and electrical work, both of which are typically handled by licensed contractors. These professionals can ensure that the work meets current codes and is safe for your family. Depending on the scope of the renovation, this may include installing new pipes or rerouting existing ones. It also might involve adding new outlets and lights or installing a new sink, dishwasher or refrigerator.

If your remodel plans call for the addition of a kitchen island, pantry, or other structure, the contractor will begin this phase by framing it out with wooden studs. This will be covered by drywall later in the process. If you are adding a garbage disposal or other appliances that require a sewage ejector, your contractor will install the necessary line and related equipment at this time as well.

This is the fun part! Once the demolition is complete and the building and installation phase has begun, your home will be transformed into a modern, functional space. In this case, our customer chose to add white shaker-style cabinets, granite countertops, porcelain flooring and more to take her small 1970’s kitchen into the 21st century.

This is where it’s important to be open and honest with your contractor about what you want and don’t want. They will help you to find solutions that meet your non-negotiable needs while keeping within your budget. They will also make sure that all of the items on your punch list have been completed.

Electrical

Once the plumbing is complete, contractors will begin working on behind-the-scenes projects like installing new electrical wiring, and updating old or repairing existing outlets, switches, and fixtures. They will also wire for any additional appliances or features that are part of your kitchen remodel plan, including a garbage disposal or a dishwasher. In a modern kitchen, you will likely want overhead lighting for general illumination and task lights above the sinks or food preparation areas.

In older homes, it is not uncommon to discover that electrical outlets in your kitchen need to be updated to accommodate modern appliances. For example, some homes lack GFCI outlets that should be located near water sources to protect against electrical shock. Other specialized projects that are often included in kitchen remodeling include adding an electrical outlet to the island, putting in a dedicated circuit for small appliances, or moving outlets to more convenient locations.

The building and installation process is one of the most time-consuming parts of a kitchen renovation, but experienced teams can typically get it done fairly quickly. It involves significant construction tasks, such as building a kitchen island, adding new windows or doors, or creating a more open floor plan. The carpentry crew will also finish up framing, and install insulation where necessary to meet building codes. In addition, HVAC ducts are installed and inspected at this point. Once all of the above items are complete, drywall will be installed on walls and ceilings.

Finishing Touches

As your renovation continues, your kitchen will start to take shape. This is an exciting stage of the process. However, it can also be stressful because you will have strangers in your home making noise and mess for weeks or even months. It is best to decide early on whether you’ll manage the project yourself or hire a general contractor (GC) and/or interior designer to help you with planning, sourcing materials and handling some of the more strenuous tasks involved in a kitchen remodel, like updating electrical work or plumbing and putting up new drywall.

Once all rough-in work is complete and passes inspection, it’s time to install drywall. Your contractor will build a frame on your walls using wooden studs and then cover it with drywall to make the room look more finished.

Many homeowners choose to add an extra step at this point, installing insulation. Insulation is usually a good idea, as it helps keep your house more energy-efficient and reduces your utility bills.

At this point, you should have a punch list prepared and discussed with your GC. This is a list of anything that doesn’t meet your full satisfaction, such as trim molding joints that don’t fit perfectly or scuff marks left behind from appliance installation. Having this list at the end of your remodel will prevent you from feeling overwhelmed by small discrepancies once your new kitchen is complete.

What Are the Different Types of Materials Used in Rendering?

Rendering can be a time-consuming and complicated process. Whether you need to create an e-commerce product rendering or a catalog, you should know a few things before starting.

The most effective way to speed up rendering is using multiple render passes. This technique allows you to separate the different aspects of a scene and render them separately. If you want to know more about rendering, you can visit Bricklayers Perth.

3D rendering transforms a digital model into high-quality, realistic images. The model may be an actual physical object or a fictional one, such as a creature, human, building, automobile, or spaceship. The models can be scanned from real life or created using a modeling program that sculpts a design based on mathematical rules. The models are then textured and lit to produce realistic imagery. Rendering can also be used to create virtual walk-throughs of unbuilt spaces.

3D visualization is an indispensable tool for architecture, product design, film, gaming, and other industries that rely on quality visual communication to persuade, entertain, and educate audiences. It allows designers to visualize a product or project from multiple angles, ensuring accuracy and efficiency in the prototyping and manufacturing processes. It also allows businesses to make informed decisions and reduce costs by identifying design flaws before production.

In addition to creating the models, rendering techniques add texture, materials, and light to a scene. Texturing adds surface detail, such as color or high-frequency detail. Lighting techniques like radiosity mimic the way light diffuses in real-world scenes, and z-buffering helps determine whether an object is visible to other objects. Finally, a composite is a post-rendering step that combines render passes and layers to create a final image.

The 3D modeling and rendering process varies depending on the project’s scope and the software used, but both stages are crucial for achieving high-quality results. The modeling phase requires creativity and attention to detail, while the rendering stage requires technical expertise and a strong understanding of lighting, colors, textures, and materials. Ultimately, rendering aims to produce an accurate and compelling representation of the design to communicate its purpose and value.

The lighting used for rendering is crucial to making the 3D model look realistic. It also adds depth to the scene and highlights the details of your design. CG artists set the lighting manually in their software so they can regulate it until it looks perfect. This makes it easier for them to meet or even exceed their client’s expectations.

Rendering is a computer-aided graphics process that turns a 3D scene into a 2D image on a screen or print. It requires complex calculations to simulate the effect of light on a scene and to produce images that are close to natural.

To make a render look realistic, it must understand the physical principles of lighting, including its intensity and color, as well as the properties of materials. Rendering is an essential tool for architects, engineers, and construction professionals. It helps them visualize their designs before they are built so they can make changes and test their ideas before committing to creating them.

A good renderer solves the rendering equation, representing all the interactions of a scene’s lights with its surfaces and materials. The equation is a mathematical solution to a complex problem that deals with the particle aspects of light physics (known as geometrical optics). The wave aspect of light, such as diffraction and polarisation, is much more difficult to simulate.

The equation also deals with other issues, such as the Nyquist-Shannon sampling theorem and its implications for image quality. This is an important concept because current image displays and human visual perception have limited ranges, so a render must be able to compress or discard large amounts of data to fit them.

When it comes to rendering, the materials used play a vital role. They tell the rendering engine how the object looks, and they also affect how light interacts with the surface. Different materials are available, and each has its own set of properties that can be modified. A few of the most common include:

Render is a cement mixture that can be applied to external walls to create a smooth or textured finish. It’s commonly used on new buildings to add a weatherproof layer between the brick construction and the elements. But it’s also an effective way to refresh an older house or unite old and new features.

Modern silicone and acrylic renders can be pre-made and arrive on-site in tubs. These can be tinted with nearly enough of any color and need less drying time than standard cement. But they’re more flexible than traditional rendering, which can cause cracking.

Cement-based or mineral renders have been around for centuries. They’re made from a mix of sharp sand and cement with sometimes a little lime to add flexibility and are built in layers. This allows them to adapt to temperature changes, and they’re more durable than other types of render.

Lime render has not become popular in the last few decades, but it has enjoyed a recent resurgence because of its flexible and breathable qualities. It’s a specialist product that requires specific ingredients and post-application washes to achieve its full benefits, but it can help prevent dampness, condensation, and mold in period properties. It can also give a unique, characterful finish that’s hard to replicate with other render options.

Reflections are transformations that flip a figure over a fixed-line. Each point in the figure is mapped to an image across that line, and the images are congruent. The word reflection comes from the Latin re-, meaning “back,” and lecture, meaning “to bend.” Light, sound, and even thoughts can be reflected on us in various ways.

The model must be modified to eliminate surfaces blocking the reflected camera’s view to render a scene with reflections. The programmer must do this based on an examination of the model. For example, the mirror and the wall it hangs would block the view of the reflected camera.

The best way to get accurate reflections is to use ray tracing, which uses the geometry of the scene and its lighting to calculate the correct values for the reflected image. However, ray tracing is very time-consuming.

A less expensive method of simulating reflections is to create a shader that selects sky and ground colors based on the “up” component of the reflected vector. This method is fine for scenes that involve mostly flat surfaces but will look unconvincing on curved surfaces.

A more advanced technique is to use environment textures, which combine the sky and ground color from a separate texture map with the reflection image. This is more realistic than the planar reflections but requires an extra rendering step for each reflection plane in the scene. For this reason, reflections are usually applied to only the most noticeable surfaces in a model. Reflections can make a boring, flat model more interesting and engaging.

Breathability is the property of a material that allows water vapor to pass through it. This is important because a material that doesn’t breathe will trap moisture beneath its surface, leading to problems such as mold and damp walls. This is why a breathable render is an ideal choice for historic properties, as it’s designed to move with the masonry of the building, minimizing the risk of cracking.

If you’ve ever been to the gym or participated in any other sweat-inducing activity, you will understand that breathability is essential for comfort. Sweat is a natural byproduct of exercise, but it can cause some issues if it stays on the skin, including unpleasantly cooling the body or becoming stuck to the clothes.

Clothing manufacturers can test the breathability of their products by channeling water through a piece of fabric and then measuring its ability to evaporate or ‘breathe.’ The more evaporation, the higher the breathability. The breathable rating of a material is called the Moisture Vapour Transmission Rate (MVTR), and it is usually expressed in g/m2/day.

A breathable render will allow moisture to escape through the surface rather than being trapped underneath, which can prevent damp walls and reduce energy costs. This is because it will enable the hygroscopic salts within a wall to liquefy and evaporate, which will help regulate humidity levels in a property.

It is also essential that the render adheres securely to the underlying masonry. If it doesn’t, it could flake off the face of a building and deteriorate over time. This will unsightly jeopardize the render’s effectiveness and cause further problems with the structure. To ensure that the render adheres firmly to the masonry, applying it to a prepared surface and using strong base coats and more flexible topcoats is best.